Digital SLRs are loaded with menus, controls and a bucketload of customisation options that are designed to make photography easier, but which can, in fact, make it more complicated and confusing to beginners.
You can of course dial up a DSLR’s green auto mode setting and treat the camera like a point-and-shoot, but this way you’ll learn precious little about the technical side of picture-taking. So, we’re going back to basics here with a guide to the 13 camera settings we think every new photography should know.
1. Aperture Priority for controlling depth of field
The aperture is the opening in the lens, formed by a set of diaphragm blades. By changing the aperture setting, these blades can be made to open and close and consequently allow more or less light to hit the camera sensor.
As well as its role in exposure, the choice of aperture also has an affect on the
depth of field. There are many situations where you’ll want precise control over the depth of field: when photographing landscapes, for instance, you’re likely to want as much depth of field as possible to give the picture plenty of foreground-to-background sharpness.
But when you’re photographing a portrait you’ll want to reduce the depth of field, in order to make the person you’re photographing stand out from the background.
To give you this flexibility, switch the camera to Aperture Priority mode. This is indicated by Av or A on the camera’s shooting mode dial. Aperture Priority is a semi-automatic mode: you control the aperture and the camera can do the rest.
Choose small apertures (represented by high f-numbers like f/11 and f/16) to increase the depth of field and select large apertures (represented by low f-numbers like f/2.8 and f/4) to reduce the depth of field.
2. Shutter Priority for photographing movement creatively
The shutter speed controls how long the camera sensor is exposed to the light let in through the aperture in the lens. To maintain a consistent exposure, the choice of shutter speed needs to be balanced with the choice of aperture.
For example, if you move from a large aperture to a small aperture in order to increase the depth of field, you’ll also reduce the amount of light let in by the lens. If you want to maintain the same exposure, you need a slower shutter speed so that the camera sensor is exposed for longer.
Going for a larger aperture to blur the background? That lets more light in, so you’ll need a faster shutter speed to expose the sensor for a shorter time.
As well as playing a part in exposure, the choice of shutter speed also affects how moving objects appear in a photo. Fast shutter speeds allow you to freeze movement so that you can see details you couldn’t normally see with the naked eye. Slow shutter speeds mean that moving objects will be rendered as a blur.
If capturing motion is the main focus of a picture – such as stopping the movement of a passing car or shooting creative long-exposure landscapes – then use Shutter Priority mode.
This is represented by Tv or S on the camera’s mode dial. Like Aperture Priority, this is a semi-automatic mode. You select the shutter speed, and the camera sets the aperture.
3. Setting a camera shake-free shutter speed
One camera setting that it’s essential to get to grips with is the minimum shutter speed for handheld photography. This is often quoted as the lens focal length expressed as a shutter speed.
For example, you should be able to take sharp handheld photos with a 200mm lens at 1/200sec and with a 28mm lens at 1/30sec (the nearest available shutter speed).
If you take pictures at a shutter speed slower than this recommended minimum, you risk camera shake – and blurred photos.
An image stabilized (IS) lens or camera body can help you get sharper results at a shutter speed around 4 ‘stops’ or Exposure Values (EV) slower than recommended.
Each time the shutter speed is doubled or halved counts as one stop. If that 200mm lens had IS, you could potentially get camera shake-free results at 1/13sec (200sec > 100sec > 50sec > 25sec > 13sec = 4 stops).
The thing is, your mileage varies may vary when it comes to holding a camera steady, and if you’re a new photographer we’d recommend using a shutter speed that will guarantee you sharp results, with IS there to help tighten things up.
4. ISO setting for low light photography
The ISO setting determines how sensitive the camera sensor is to light. At lower settings, such as ISO 100 and 200, the camera is less sensitive to light and needs more of it to record a picture.
At higher settings, such as ISO 3200 and 6400, the camera is more sensitive to light and doesn’t require as much to make an exposure.
When you’re shooting in low light, you may not be able to select an aperture large enough to let enough light into the lens, or set a shutter speed that’s fast enough to give you sharp pictures. This is where a change of ISO comes in.
By choosing a higher ISO sensitivity, you can essentially amplify the sensor’s signal. Each time the ISO doubles, you’re amplifying the signal by one stop/EV. So, increasing ISO 100 to ISO 200 is one stop, as is increasing the sensitivity from ISO 800 to ISO 1600.
The best quality ISO settings are low ones. This is because when the ISO amplifies the signal, it also increases any ‘noise’ (the digital equivalent of film grain).
You’ll probably notice picture quality getting choppier from ISO 1600 and upwards, but, as the photography saying goes, it’s better to have a sharp, noisy picture than no picture at all…
5. Auto ISO setting for handheld photography
Rather than learning how to manually adjust the ISO setting, you can leave it to your camera to do it for you. Select ISO and scroll to the ‘
Auto ISO‘ setting, and the camera will automatically adjust the sensitivity according to the lighting conditions.
It assumes that you’re handholding the camera rather than having it fixed to a tripod, and will increase (and decrease) the ISO to ensure that the shutter speed is fast enough to give you sharp pictures.
You can usually limit the ISO range that the camera can choose from too, so you can be sure the maximum ISO available to the camera won’t be excessively high (along with the excessively high noise this brings).
6. Setting the right metering mode
Broadly speaking, digital cameras have three different metering mode settings: pattern, centre-weighted and spot metering.
A factory-fresh camera is set to pattern metering mode. Camera manufacturers have different names for this mode – for instance, it’s called evaluative metering on Canon cameras and matrix metering on Nikon cameras – but the principle is the same. The camera meter splits the entire image into multiple zones.
It then measures the brightness levels in each zone, compares the results and suggests an exposure (a combination of aperture, shutter speed and ISO, depending on what shooting mode you’re using).
Pattern metering is fast and generally reliable – a great ‘point and shoot’ exposure mode. It can be fooled by large expanses of bright or dark tone though, and usually benefits from some
exposure compensation.
Like multi-zone metering, centre-weighted metering measures the brightness across the entire frame but, as the name suggests, it gives priority to what’s in the middle of the frame.
This makes it a good choice for portraits, particularly backlit ones. If your subject isn’t in the centre, than the exposure might not be correct. It can be fairly easy to predict when centre-weighted metering is going to get things wrong though, making it easier to know when you need to make the exposure brighter or darker.
Spot metering offers the most precise way of metering as it measures an area approximately the size of one of the AF points you see in the viewfinder.
We’d recommend that new photographers avoid spot metering to begin with though, as it only requires a micro-movement of the camera position to completely throw the exposure off.
7. Improving the exposure with exposure compensation
If a photo looks too bright or too dark on the back of the camera then you may need to use exposure compensation.
You can activate exposure compensation using your camera’s quick control screen or by pressing the button marked ‘+/-’. Rotate the camera’s control dial as you do so and you’ll see an indicator move along the scale in the bottom of the viewfinder or on the rear monitor.
If you move the indicator towards the ‘+’ end of the scale, subsequent pictures you take will appear brighter. And, as you’d expect, if the indicator is pushed towards the ‘-’ end, subsequent pictures will be darker.
Remember to reset the exposure compensation setting to zero once you’ve finished taking the picture, so that you don’t end up with
exposure problemswith other photos!
How much exposure compensation do you need to apply to a photo? It’s a case of trial and error when you’re new to photography, but learning
how to read a histogram makes it much easier…
8. Playback with histogram
You can’t really judge the exposure of a photo by looking at it on the back of a camera. A DSLR’s LCD screen is often too bright or too dark to give an accurate picture.
However, one of the most useful camera settings is the playback option that allows you to view a brightness histogram alongside the image.
The histogram enables you to see the brightness range of your image as a graph, so you can immediately tell if a photo is underexposed (too dark) or overexposed (too bright), and if so, to what extent. You’ll be able to get a much better feel for how much exposure compensation to apply (if any) than by looking at the picture alone.
9. Picture quality: RAW vs JPEG
By default, a digital SLR has its Picture Quality set to JPEG mode. JPEG is a universal format, allowing you to share photos easily.
The problem is that JPEG is a compressed format, and some picture information has to be lost in order to compress the file. However, you’ll be hard-pressed to notice any real loss of quality at the highest JPEG quality setting.
RAW files aren’t actually pictures at all, but rather a file containing the raw information from the camera.
The image you see on the back of the camera is actually a JPEG preview based on the shooting parameters set at the time of shooting, and you’ll need to process the file yourself in RAW conversion software before you can share the image as a JPEG of TIFF.
The good news is that RAW files are uncompressed (or use lossless compression) so they offer the best picture quality. They also enable you to adjust the exposure and change the image-processing settings used at the time of shooting, such as the choice of white balance and Picture Style.
10. White balance manual presets
A digital camera’s white balance control helps you get accurate colours in different types of lighting. Most of the time, leaving the white balance in Automatic mode will produce well balanced pictures.
However, Auto White Balance can get things wrong: it may leave pictures shot in natural light looking a little cool, and pictures taken under artificial lighting with a strange colour cast.
To correct this, use a white balance preset that best matches the type of lighting you’re shooting in. Shoot with the camera in Live View mode and you even get a realtime preview of the white balance preset, enabling you to adjust it before you take the picture.
Alternatively, choose the RAW Picture Quality setting and you can fine-tune the white balance when you process the RAW file.
11. Manual autofocus point selection
If you leave it to your camera to decide where to focus, the chances are it’ll lock onto the nearest thing to the lens or on an area of high contrast (such as a brightly lit object in an area of shadow).
The trouble is, this may not be where the main subject is in the picture, leaving you with a nicely sharp foreground or background and an out-of-focus subject!
You can tell the camera where you want it to focus by switching the AF point selection mode to Manual rather than Automatic. This enables you to choose either a single autofocus point in the viewfinder or a small cluster of them.
Camera manufacturers have different ways of activating this manual AF point selection mode (also known as AF-area mode): in some cases there’s a dedicated button that cycles between automatic and manual modes, and in others there’s a switch.
Some beginner DSLRs lack both, and you have to select the option on the camera’s rear screen before you can manually select an AF point.
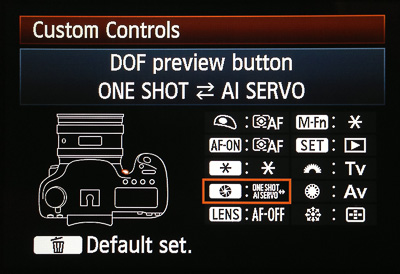
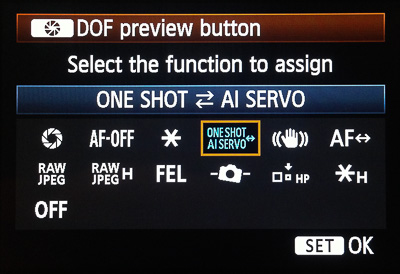
12. How to choose the correct autofocus setting
Digital cameras have three autofocus settings: One-shot AF, AI Servo AF and AI Focus AF.
One-shot AF (also known as Single-servo AF) stops the lens from autofocusing once it’s locked onto an object. The focus won’t shift as long as you keep your finger half-pressed on the shutter release, making it an excellent AF mode for static subjects.
In AI Servo AF (aka Continuous-servo AF), the camera doesn’t lock the focus, but continually refocuses the lens. Naturally, this is the mode to choose when you’re photographing moving subjects.
The third mode, AI Focus AF (or Auto-servo AF) automatically switches from One-shot AF to AI Servo AF when it detects a moving subject. However, there’s a lot to be said for the peace of mind that comes from manually setting the correct AF mode according for the scene being photographed.
13. The best drive mode to begin with
Your camera is equipped with various drive modes, such as single frame, silent and self-timer.
However, we suggest you stick the camera in continuous drive mode. This will allow you to take bursts of shots for as long as you keep the shutter release button pressed. With practice, it’s easy enough to fire off a single frame with the camera in its continuous drive setting if you need to.
Continuous drive makes a smart choice when shooting moving subjects, allowing you to capture sequences of shots from which you can select the best frame.
Shoot in short bursts rather than keeping your finger on the shutter release all the time, otherwise the camera’s buffer — the place where it stores images before transferring to the memory card — will fill up and the camera will slow down.